This is a quick tip on how I fix all the screw holes that have their threads stripped:
Category Archives: Tips
My DIY Coconut Milk Story
This is my story of making my own coconut milk. Enjoy!
I learned how to make coconut milk from John Koehler of OKRaw.com. See below:
You can find all of John’s Coconut Milk videos here. He is a real authority on coconut milk.
Remember to do all things in moderation, especially drinking coconut milk, or you may suffer the same consequence I had.
Old Drywall Screw Holes – How I Fixed It
I replaced the drapes pole and ended up with a few empty holes left over from the previous drape brackets. It’s ugly and I need to patch them up. In this video, I recorded how I applied Fix-It-All Patch Compound to the holes and sand them and applied the touch-up paint.
My “Puppet” Trellis System with PVC Pipes – How I Built It
I have been challenged by the difficulty of trellising container tomatoes this season. I want to have a trellis that’s easy to assemble and disassemble when the season is over. I don’t want to spend a lot of money and yet not having it too aesthetically challenged. I built a simple trellis system using the leftover 1×2 wood. I called it “puppet” trellis because it looks like a controlling mechanism for a puppet. It worked well when staked in the ground. But for the container gardening, the ground is normally hard cement. I decided to try building the “puppet” trellis with PVC pipes and stake the pipe into an old umbrella base. I recorded a video of my “Puppet” trellis system here:
It’s possible to build the base of the trellis with more PVC pipes. It will be one of my future projects.
Drip Irrigation Pipe Leaking – How I Fixed It
I noticed my drip irrigation pipe was leaking a few months back. I was too lazy to fix it but now we are in a middle of severe drought in California, I thought I should take care of it to avoid wasting our precious water. Here I recorded a video on how I fixed it:
Here are the lessons I have learned:
1. 3/4″ PVP pipe is NOT exactly 3/4″, neither are 1/2″ and 1″ pipes or any of the PVC pipes. In fact, the 3/4″ pipe has an outer diameter of 1.05″ and inner diameter of 0.82″. The number represents roughly an average of the inner diameter and outer diameter, depending on what type of PVC pipes (Schedule 40 vs. thicker Schedule 80). See here for the actual measurements.
2. PVC pipes are very inexpensive and easy to put together like Lego blocks. The 10′ 3/4″ PVC pipe cost me just $2.50. This gave me lots of ideas how to use it for other purposes. See future blogs on the other uses of PVC pipes.
Toilet Flapper Closes Too Soon Resulting in Poor/Weak Flushes – How I Fixed It
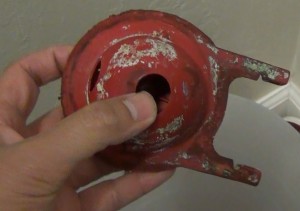
Lately, I noticed that my bathroom toilet developed a slow leak such that the water tank would refill by itself without anyone pushing the lever. I checked the flapper and noticed the flapper was well passed its usable life – lots of calcium deposit and the perimeter of the flapper developed rough surfaces to not seal properly with the outlet ring. See below:

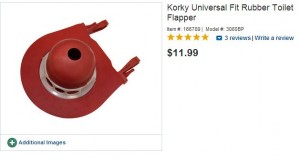
I purchased a replacement Korky flapper with an adjustable air holes for adjusting the timing of the closing from 1 to 8.

I tried from 1 to 8 and flapper still closed too soon resulting in poor or weak flushes, which would eventually lead to build up and expensive rooting bills.
The one that did the trick, despite Korky’s video instructions, is to loosen slightly the chain that connects between the handle bar to the flapper. My guess is that the slack of the chain create a whiplash condition to float up the flapper momentarily and long enough for the flapper to stay up for more water to flow out. I noticed this particular trick in my previous blog here. If there is insufficient slack (too tight), the pulling force would cause the flapper to bounce off and close the flapper too fast. And if there is too much slack, the flapper would not open. You’d need to experiment to come up with a optimal slack. For me it’s around 3/4″ to 1″. There is a sweep spot in the amount of the slack. Play with it but conserve water if you’re in a drought situation like we do here in California.
Drape Track Problem – Bracket Pulled Out of Drywall – How I Fixed It and How I Should’ve Fixed it
For a while now, I’ve noticed the drape in my master bedroom was getting very difficult to pull its string to close and open. Then I noticed the bracket that supported the drape track started getting pulled out of the drywall. To avoid further drywall damage, I moved the bracket a couple of inches to the right. This didn’t help. The same drywall problem persisted.
I decided to get rid of the old track and purchase a new drape pole and 20 rings to hang the drape without the complicated string pulling mechanism. The most difficult part of the installation was to determine the height of the support bracket. It needs to allow the drape to just clear the floor – high enough to clear the drape and low enough to cover the gap. I originally made a mistake of assuming ring cover the diameter of the pole but it turned out to a wrong assumption. There was at least a 1/4″ of gap in the ring. Then the pole also sag a bit due to the weight of the drape and the fact that there is no support bracket in the middle, unlike the original drape track. I decided to placed two support brackets at each end to help relieve the weight of the force. Finally, there were lots of holes left from the previous track that has 3 additional brackets in the middle. Lots of drywall patch work.
After I was all done with the installation, I decided to dissect the old track and figure out where it broke. I did see some broken plastic piece in the opposite end of the track. After playing with the track, it dawned on me that all the extra force problem was due to a loose screw at the pivot pulley mechanism. Had I just tighten that screw or added another screw to fix the pulley in place, I would have fixed the entire problem!
What an ironic twist to my ordeal! Yes, I did end up with a more modern drape pole and lots of “fun” time shopping and installing the new track. But just tightening one screw? Really?
The lessons learned:
1. Always try to understand why things don’t work before you start disassembling things. You may find out you don’t need to do much to fix the problem like in this case.
2. Perform a postmortem to understand why things don’t work at the end can contribute a great deal to your learning.
