Category Archives: Tips

Don’t Dispose! Compost! – a Toastmaster Speech

I’m very fortunate working in Milpitas, where a large landfill is located. Every day when I walk outside of this building, I’m reminded of the Milpitas Smell and the environmental hazard right under our nose. Some days more than the others. In the US, we generate 4.4 lbs of garbage per person per day. Japan has only 2 lbs. In addition to the environmental impact which we often heard of, there are economic impacts –expensive garbage utility bill and the burden of recycling fees, future cleanup fee. Some are hidden, some are outright costs.

Today, I want to make a case for everyone to do his/her part in reducing the garbage generation. The often-mentioned method is to reduce, reuse, and recycle. A large part of our garbage comes from our food or kitchen waste. My focus today is about composting your kitchen wastes. And I will introduce you to my favorite method.

There are several composting methods that I’m aware of and being practiced: traditional, vermicomposting, Bokashi composting, and natural way of dig and bury. My criteria for selecting the composting method are: Ease of setup, maintenance, and post- process, compost material, smell factor, and duration.

The traditional composting is basically pile one layer “brown”/carbon material (like dry leaves, paper) upon one layer of “green” material (like grass, vegetables with nitrogen). To compost, the aerobic bacteria are to consume the material, a process there needs to have a critical mass, roughly a cubic yard or 3’x3’x3’ to get started. This is not practical for city dwellers like most of us. I have tried to do this a couple of times but ended up with a smelly pile and had to abandon it after protests from my family and neighbors and it requires turning of the pile regularly. It’s good for industrial/commercial operation, not for small daily kitchen waste.

The next method is deploying the earthly soldiers to digest the kitchen waste: worms, which for some people, hearing the word is already repulsive, not even to turn them into “pets.” My early effort in vermicomposting resulted in a major migration of the red wigglers. Not pretty if your best kitchen wastes aren’t good enough for the earth’s “guts.” They rather die drying up on the cement floor than to put up with the “feast” you put in front of them. I did have some success later on and managed to maintain two large bins of worms for over two years. But they’re picky eaters, no protein nor meat. I set them free on my yard last year.

The dig-and-bury method is digging a trench around the drip line or garden bed and continue to bury the kitchen waste daily. Not my favorite way because of the daily work and the trip hazard.

I will focus on the Bokashi method which I have been practicing for the last 5 years.

Bokashi means “fermented organic matter,” translated from Japanese. It was discovered by Dr. Teuro Higa in Japan. By fermenting or pickling your kitchen wastes including meat, fish or almost all your organic matters, you avoid the ugly parts of common composting: smells and bugs from decomposing matters and maintenance work of turning the piles. But there is some work of burying the finished Bokashi at the end, which I do every 3 months or so.

To get started, you would need three things: 1) 3x to 5x 5-gal buckets and lids – your pickling jars – the more you’ve got the less frequently you’d need to bury the contents but more spaces you’d need, 2) a small kitchen pale to collect the daily kitchen waste and 3) the Bokashi brans, which is the “magic” ingredient/ inoculator to pickle. You can buy the Bokashi brans for $12 on Amazon, which would last you about 2~ 4 months. After the initial $25 fixed costs of the buckets and pale, the on-going cost is the Bokashi brans for $1/week. You can drop it down to a quarter/week if you make your own bran like I do. For us gardeners, we spent more than that on fertilizer or soil.

The 5-gal bucket need have some newspaper or card boards sprinkled with some Bokashi bran to keep the fluid from accumulating in the bottom. Daily or every other day, you would dump your kitchen waste into the bucket and sprinkle some Bokashi bran over it, then use a round dish plate push it in and cover it up with the plate and the bucket lid without snapping it. When it’s full, snap on the lid until you’re free to bury it. I usually accumulate 5 buckets, so I don’t need to bury them too often due to my laziness.

Just dig holes just outside the drip line of your trees or bare garden bed or raised bed, dump the contents, cover it with 4~6” of soil to avoid critters or your pets from digging it up. The bacteria or earth worms will consume the entire contents within a few months and turn them into rich organic fertilizer. It’s easy, rewarding and good for the environment. I hope you all can give it a try.

Shoe Horn Pant Lifter – A LearnByBlogging Quick Tip and Gadget


Here’s a quick tip – make yourself a shoehorn pant lifter. Why? Because it’s the best thing since the sliced bread. Probably not, but it’s pretty close. When I leave home for office, I used to struggle with shoehorning my feet into the shoes because I carry my laptop and other things and my pants tend to get caught in the shoe. This shoehorn pant lifter allows you to shoehorn your feet without catching your pants in the shoes. Try it! You might like it!
Here’s the 3D file for you to modify or print directly.

Comcast Login Error when Watching AMC Episodes – How I Fixed It – a LearnByBlogging Quick Tip

For the last few weeks, I have trying to watch my favorite AMC shows like “The Walking Dead” on my computer. Typically, when you click on Watch Episode which AMC allows you to watch the full episodes within 70 days of the showing, it will ask for your cable provider. See below:

My cable provider is Comcast. When I selected Xfinity (the Comcast proxy), the browser would hang for a few seconds then came out with a comcast login failure. This would happen when you select Xfinity, nothing else. I’ve tried for weeks without success and googled around without a clue how to fix it.

How did I fix it? I just logged into Comcast Xfinity site. It prompted me to identify the name of device. I entered “My Computer,” then I was able to search and watch the “Walking Dead” program. Afterward, I could now go to the AMC site, select my episode, and select Xfinity. Voila! I could now watch any episode at will.

Sewer Backup at Home – What I Learned

A couple of weeks ago, I was woken up by the gurgling/bubbling noise from my bathroom toilet as the washer was started and running before going to bed. I noted it as some sort of dream and forgot about it. Then a couple of days later, I noticed the same phenomenon when the washer was running again, this time during the day time while I was in my den and wide awake.

Not good. The sewer was backed up!

I tried snaking from the toilet, from the washer sink and then from the cleanout to the side of the house. Still not good. In fact, I made it worse, now the toilet was consistently backed up and almost overflowing.

At this point, I was pretty exhausted and I figured it’s time to call the pro. It was Sunday afternoon. I called several rooters/plumbers and none of them could make it the same day. They were so busy that the next appointment was going to be a few days later. Fortunately, one of the plumbers suggested that it’s mostly likely the “mainline” being backed up. and he suggested that I check if there is cleanout near the sidewalk, hinting that if it’s backed up there, the city may be responsible for taking care of the problem because it’s between my house and the sewer running under the city street – a responsibility of the city, as long as the cleanout is within 5 feet of the sidewalk.

So I checked and there was a cleanout that was overflowing to my front yard and it’s within 2 feet of the side walk.

I immediately called the Cupertino City Sanitation Service Department. Sure enough, they said they can check it out within 30 minutes as they were doing some work a few blocks away. The guy told us to stop using the sewer (no toilet, washing and other things that might drain).

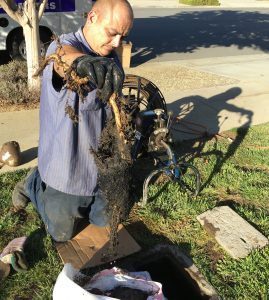
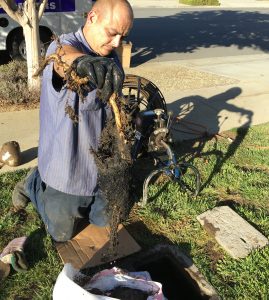
About 30 minutes later, the city sanitation person showed up and saw the situation and said that the contractor, Roto Rooter, will come over when he’s done with the previous job. He started scooping up the water to his 5-gal bucket. The Roto Rooter guy showed up within 15 minutes and started the snaking process. But they first wet vacuumed the whole cleanout and opened up the cleanout that has a ball over the tube and a Darthvader-helmet-like cap over it. As soon as he punch through the first root-like obstruction, the sewer water flew smoothly. He eventually cleaned up the opening and pulled a carrot-like root (see picture) out of the tube. As it turned out, the root of the tree near the sidewalk was spreading into the cleanout to sip the sewer water – probably a result of years of drought in our area.
Pulling Root
ThecRoto Rooter guy snaked it one more time to be sure and finished the job within 30 minutes. I flushed both toilets and ran water in the tub for a few minutes to clean out all the accumulated residues in the drain pipe. And it was done without costing me a dime!

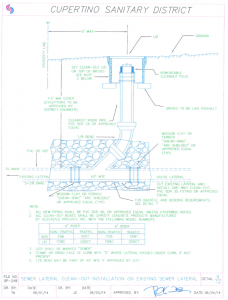
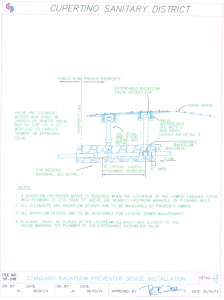
A couple of days later, the city came back with a camera-attached snake to look through the pipe and cited several code issues with my cleanout. See photos below on the existing cleanout vs the new standard cleanout design. Then a couple of days later, the city contracted with Roto Rooter to snake it one more time to be sure. Now, that’s tax dollars at work!

Here are what I learned:
– Bubbling in the toilet is most likely a mainline sewer backup. Check the cleanout closest to the street first.
– Snaking from inside the house for a mainline backup problem is not productive.
– The city is responsible for the mainline backup if the cleanout is backed up within 5 feet of the sidewalk.
– The modern cleanout design makes sewer backup much easier to remedy. The technology in human living environment continue to advance. It’s not your father’s sewer system any more.

Existing Cleanout Design:
existing-cleanout

New Cleanout Design:
new-cleanout

Honeywell Water Heater Thermostat Woe – How I Fixed It


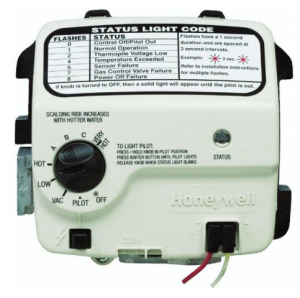
I heard a scream from my wife in the shower, “No hot water! No hot water! What’s going on?!” Not good. This was 10pm two days ago. My first thought was that the water heater pilot light went out, based on my past experience. What else could it be? I checked that AO Smith Gas Water heater in the laundry room right away. The water heater comes with a sophisticated, advanced Honeywell Water Heater thermostat/valve that provides continuous monitoring of the water temperature and turning on and off the gas accordingly – all without battery. It uses a “thermopile” technology that converts thermal energy into electrical energy. It’s composed of serveral thermocouples connected in series to create roughly 350 mV of energy. What a nifty device!
honeywell-module

Except when it’s not working.

I first tried resetting the module by turning it to off and re-start the pilot light by turning the dial to “Pilot”, holding down “Pilot” and push the spark igniter. The system kept coming back with 4 flashes. Based on the “Status Light Code,” it means “Temperature Exceeded.” It made sense as we had a heat wave recently. So I figured the system should reset itself once the over temperature condition goes away. I kept resetting the system without much success to get the gas burner to turn on again.

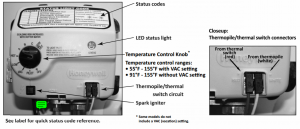
I googled around and came across this website by Tyler Tork. Wow, so many people had the same problem dating back to 2013. The problem is that the microcontroller inside the unit remembers the last “over-temp condition” and would not forget it. The recommended fix is to disconnect everything from the module for an hour and let the power dissipated to “flush” out the memory.
honeywell-module-labels

That sounded easy. I tried disconnecting it for 30 minutes. No go. 60 minutes: No go. I left it disconnected for overnight. Still no go. I even flushed some of water out to get the sediments out as it’s a source of heat barrier that contributes to overheating.

One of the people commented “shorting” everything on the little printed circuit board to really “short circuit” the memory cell, most likely the big capacitors. And that’s what I did, I figured I have nothing to lose as I would need to replace it if it didn’t work. So I removed the PCB (printed circuit board) from its housing by unscrewing the torx screw and snapping the PCB from the housing. Then I took a sheet of aluminum foil (an electricity conducting material) and touch all the various solder joints (silver-looking blobs) especially the big capacitors, which are the energy storage devices. See figures.
pcb-component-side
Honeywell PCB Bottom Side
Then I put it back to its housing and put everything back to its original positions. Turn on the pilot and hit the spark lighter. I first saw the LED flashed 7 times, which means “Gas Controller Valve Failure.” Doesn’t sound good. Then I proceeded to dial it up to temperature setting A. Immediately, the burner turns on and we have a lift off! After a minute or so, the LED started blinking once and paused and blinking once again. This means “Normal Operation.” We’re back in business now. I just saved $110 (Walmart’s price) for the module and enduring days of suffering through cold showers and complaints from my family members. Viva DIY!