Category Archives: Tips

Jerky Brakes on My Nissan Leaf – How I Got It Fixed – Upgrade the App?

For several months now since I had my regular maintenance done on my 2013 Nissan Leaf, I have been experiencing very jerky brakes – sudden stop and jerk forward – driving my car. It’s like having an automatic-transmission car with super-fast idle speed and a digital(on/off) brake system. I felt bad as my passengers (my wife and daughter) kept complaining that I drove like a novice driver and it’s making them car sick. But no matter how hard I tried to soft peddle the brake, I would end up braking too short and when I let go slightly the car would jerk forward then stop. Or it would end up braking too slowly and I had to brake hard to avoid rear ending the car in front of me. It was an annoying and frustrating couple of months. I asked other Leaf owners, none of them experienced the same problem.

I decided to bring the car to the dealership last Saturday (5/30/14) and was prepared to leave it there until Monday if necessary as the “Master Tech” wasn’t on duty to diagnose this complicated problem.

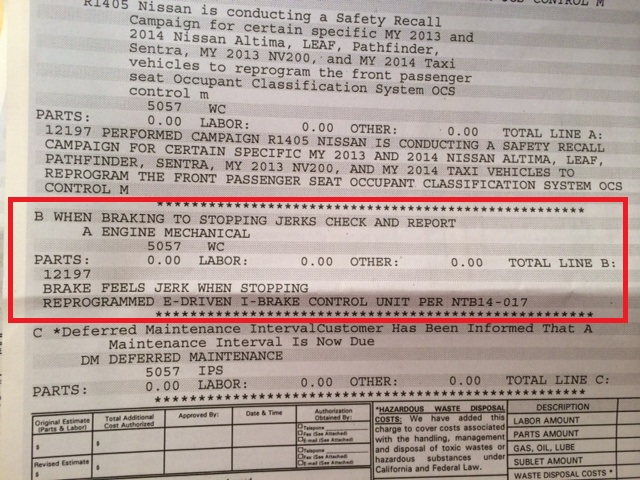
Within 2 hours I got a call from Paul, the service adviser in Stevens Creek Nissan Dealership that the problem has been fixed with the “reprogramming of the E-driven I-Brake Control Unit; it was in the service bulletin.” See invoice below:
Nissan Brake Invoice
Wow, little did I know that the braking system nowadays are more or less run by an on-board computer. That’s amazing!

Now the car is back to normal and I’m enjoying driving my Nissan Leaf again, zipping through the freeway during traffic hours on the “carpool” lane, to and from work. πŸ˜‰

A couple of things I learned from this experience:
1. If you encounter any car problems, search on Internet if there’s already a “service bulletin” outstanding that can address your specific car problem. I found that I could have found it on Internet and brought it to the dealership earlier instead of experiencing months of embarrassment. Make sure you have your car year/model and “service bulletin” key words. For example, for me it’s “nissan leaf 2013 service bulletin brake” for the Google search string.

2. More and more of the modern car or household appliances are run by computer. The upside is that the fix may be just a simple software upgrade and you’re back in business. The downsize that as the car is increasingly connected to the Internet as my Nissan Leaf is connected via 3G network, there may be more security/safety issues if someone can practically hack into your on-board car computer and cause a serious safety problem, e.g. by disabling the brake when you’re cruising on the freeway, and etc. The consequences could be deadly. It’s something we engineers need to pay special attention in our design work.

Bayesian Theorem for the Practical Thinkers

I have been reading up on Bayesian Theorem, as you might have noticed based on my past blog posts. What really gets me is how hard it is to think in practical terms for people in general without a degree in Statistics and without resorting to complicated math. Because Bayesian Theorem/Inference is so useful in our daily lives, I would like to share my shortcut so people can calculate the probability using a simple 10-key calculator instead of a computer.

The shortcut is to always think in terms of odds instead of probability. The power of Bayesian Theorem is to take the base rate and after some new evidences provided the modified rate.

The best way to learn this is to use some examples:

Example 1:
From this blog, here is an example:

1% of women have breast cancer (and therefore 99% do not).
80% of mammograms detect breast cancer when it is there (and therefore 20% miss it).
9.6% of mammograms detect breast cancer when it’s not there (and therefore 90.4% correctly return a negative result).
What’s the probability of having the breast cancer once detected positive by mammograms?

The trick is to think of the base odd of getting the breast cancer:
1% to 99% = 1 to 99
Now think of the odd the evidence provided by mammograms:
80% to 9.6% = 8.33 to 1

So the odd of having the breast cancer when tested positive by mammograms are:
1/99 * 8.33/1 = 8.33/99 = 0.084 or “odd of 0.084 to 1”

Now you must convert the odd to probability (if probability is what you’re looking for):
0.084 to 1 odd = 0.084/(1+0.084) = 7.8%

Example 2:
Allen Downey, my favorite Bayesian Statistics author and professor, has this example in his blog:
Elvis Presley had a twin brother who died at birth. What is the probability that Elvis was an identical twin?

You need the following facts:
”Twins are estimated to be approximately 1.9% of the world population, with monozygotic twins making up 0.2% of the total—and 8% of all twins.”

The odd of getting identical twin to fraternal twins are:
8% of twins are identical twins
92% of twins are fraternal twins
So the odd of identical twins is 8% to 92% or 0.087 to 1

Now there is another piece of information we must take into account => It’s a twin brother. The odd of same sex in a twin increases the odd that his brother is an identical twin. What’s the odd? It’s 2:1 ( identical twin brother + fraternal twin brother to fraternal sister).

So the odd of Elvis’s brother being an identical twin is:
0.087:1 x 2:1 = 0.174:1
Converted to probability => 0.174/(1+0.174) = 15%

Example 3:
Let’s do a final example from Example 5 of Allen Downey’s blog:
According to the CDC, “Compared to nonsmokers, men who smoke are about 23 times more likely to develop lung cancer and women who smoke are about 13 times more likely.”
If you learn that a woman has been diagnosed with lung cancer, and you know nothing else about her, what is the probability that she is a smoker?

So the odd of getting cancer as a woman who smoke is 13 to 1 (13:1). Now we need to know the base odd of women who smoke to non-smoking women. From the blog, it’s 17.9% of woman smoke. So the odd is 17.9% to 82.1% or 0.21:1
So the odd that the woman is a smoker is:
13:1 x 0.21:1 = 2.83:1 => 2.83/(1+2.83)= 74%

Now isn’t that more intuitive and practical. Go out and apply the Bayesian Theorem in a party to impress people.
Or maybe you want to calculate your chance of meeting single women if you were a single men. Let’s say you’re going to a friend’s party whose friends are 25% female and 75% male and there’s a probability that 20% of the female are single, 80% is not single or unavailable. There you have base odd of 1:3 (25%:75%)and the odd of meeting single women is 1:4 (20%:80%). Your odd of meeting a single woman in a party is going to be (1/3)*(1/4)=1/12 or 0.083:1 => 7.7%. Suppose you’re highly selective and possess a prince charming quality, your odd of finding your qualified, desirable women is 1:10. Now your odd just drop to 1/120 or 0.83%. Unless the party attendance is going to be > 120 people, then it’s worth a shot. Otherwise, you might as well stay home and watch a sports game at home instead πŸ˜‰

Gnats on the Bathroom Sink – How I Fixed It (Got Rid of Them)

About 2 weeks ago, I noticed there were many little flies (gnats) flying above my bathroom sink. I know them because I had a similar problem in the office. See this blog.

What’s strange about it was where they came from. My wife’s sink next to mine didn’t have them. I figured they (the gnat larvae) must be coming from the standing water in the P-trap of MY sink. Someone from the Internet suggest pouring some Clorox bleach into the sink will take care of it. So I did the same. It worked for a day or so then the gnats came back. And I poured more bleach. Not much different. Now I was mad and puzzled! Where were the larvae?

They were definitely not in the P-trap because the bleach would surely kill them. Then it’s somewhere between the sink hole and the P-trap – which was the lever rod that control the sink stopper. See below diagram: But I had used ZipIt to pull out all kinds of hair before!?
Sink Holes Anatomy

I decided to disassemble the sink rod-stopper (drain pop-up) and pulled out the pop-up stopper. This is a relatively easy procedure. Just twist off the nut cover (PP6132 part in the diagram) and slide out the rod slightly (keep all the parts together) to remove the stopper, which is hooked into the rod.

Boy, was I surprised by the gross, dark, gooey stuff along each compartment formed by the X cross section of the stopper! I almost threw up so I didn’t want to show the picture to gross everyone out. I had to use lots of tissue paper to wipe it off the stopper before installing it back.

After putting it all back, I noticed the water flow as much faster now and the gnats were all gone within a day. Evidently the larvae were all living in and feeding off the gooey stuff on the stopper. Yak!

Lessons learned:
1. Fix the slow water flow problem ASAP. Use ZipIt to pull out the hair stoppage but to remove the gooey stuff, you’d need to disassemble the sink drain pipe, starting with the stopper/rod then move on to the P-trap, then the horizontal pipe. (I’m glad I didn’t have to go on to the P-trap step).

2. Google around how people fixed their gnats problem first but use your own judgement where the problem might lie. For me, this video provided the best information for me on how to unclog the drain:

Gnats on the House Plants – How I Fixed It

My office window is facing north with very little direct sun light so I kept my shades rolled up permanently to keep the outside light in – keep my work spirit up. I figured adding a plant would add additional vitality to the office while the plant can thrive. All sounds good for three months until two weeks ago, when I started noticing “little flies” flying around my office, keyboard, monitor, table – everywhere. It’s a war zone! I researched/googled around and found their official name to be “fungus gnats” and they are prolific breeders by laying eggs which turn into larvae and then the adult gnats. They like damp soil surface where they lay their eggs.

They are many ways to get rid of them. First, one must get rid of the larvae. I use BT (Bacillus thuringiensis), the same organic pesticide I used to kill the caterpillar/worms on my vegetables. Then how do I get rid of the adult gnats? I tried the vinegar traps, fermenting vinegar trap, and water trap. I finally got fed up with the slow progress, went out and bought a flying insect spray for $1 at Big Lots. And it took care of the problem pronto. Just a couple of shots and they’re gone! I thought I shared my experience with you in this video:

A Suction Cup Does Not Stick or Stay Stuck Any More – How I Fixed It

One of the easiest way to keep the shower door/glass from building up mildew is to wipe off the water at the end of your shower. A 1-minutes maneuver would save you many minutes of scrubbing or applying the harmful chemical to clean it afterward. So I bought this squeegee with a suction cup stuck to the shower wall to hold the squeegee. See below:
Squeegee and suction cup
It worked really well for over a year. But lately, the suction cup started to lose its elasticity (kind of like most parts of human anatomy πŸ˜‰ attributed to aging) and would not stay stuck on the wall any more, no matter how hard I try. Since it’s a custom suction cup (see below), I would need to buy another set as the suction cup cannot be bought separately.
Suction Cup for Squeegee
After googling around, I came across this method to bring back the suction cup’s elasticity; I boiled the suction cup for about 10 minutes. Now it worked like a charm. I only wish fixing human elasticity would be that easy. One thing I did observe was the color became more milky (Did boiling change the chemical structure of the plastic somewhat?). I don’t know how long it would stay stuck on the wall. But time will tell. If the same problem occurs again, I would probably get a new one next time.

Irrigation System Burst/Flooded – How I Fixed It

One of the worst nightmares anyone could have is the burst of water pipe especially when you’re not home to save the day, not to mention the high water bill that you’ll soon see from your water company in addition to the damage you would incur. This happened to my drip irrigation system today under the 100F+ heat. There was so much water that the sump pump turned on and the noise alerted my wife, who managed to turn off the main valve and text messaged me at work. I recorded this video about the damage and how I repaired it and put in some protection to prevent any future occurrences.

Among all the household repair work, I dreaded plumbing repair the most because it always ended up worst than I expected, partly because of the previous bad patch work and the connecting components age differently. To save future headaches, I tend to replace as many components as possible. This one is no exception. I ended up replacing the leader hose to the irrigation system and the Y-splitter coming off the faucet because of the damage during repair. This whole repair work cost more more than $40 at the end.

On the other hand, you can always learn the lessons from the damages you incurred. What don’t kill you or your spirit make you stronger.

Sprinkler Valve Leaking Water- How I Fixed It

Since last December I observed my sprinkler valve was leaking water. I went ahead and shut off the isolation valve and kept it off until this weekend to fix it, as we have finally reached the dry season and further procrastination may result in serious plant damages. See the problem video here: (in spoken Chinese)

Thanks to this video below, I was able to clean out the gummy sediment from years of operation: I was glad that valve was still in good shape such that I didn’t have to replace the whole value.

There are different kinds of sprinkler valve, our Lawn Genie closely matches the screw-cap type like the one in this video:

The valve operation among the various vendors are similar. It consists of a diaphragm and a solenoid (the black cylinder that connects to the electrical wire). Without the electricity, the valve is normally shut off. When the electricity is applied, the solenoid pull up the plunger, releasing the water above the diaphragm, allowing the water to go through. Here is a good explanation of how it works.

Lessons learned:
1. Check Youtube/Google the available resources before commencing the repair work. Even if you have done the same repair before, there are always something that can refresh your memory and new tricks others have learned.
2. Keep clear of the work area so that you can place all the parts clearly visible in front of you. I almost lost the tiny plunger rod and had to look for a long time – not cool.